Thursday, June 18, 2009

Celery Salad from Bountiful Baskets

I am determined to not waste anything fomr my BB (Bountiful Baskets)! If we don't use it all, we are not saving as much as possible. It has become quiter a fun game for me. So here is one of the salads that I am making today. Later, I will adding a couple more cucumber salads.

Sorry that there aren't more pictures. While Gabriel was here, I put black-eyed peas in the wonder box and small crock pot, then started the salads. In the middle of it all, Stephen brought Lincoln and picked up Gabriel. Poor little Lincoln got hungry and fussy. Since I get to be the ogre who is teaching him to take a bottle when mommy isn't here, things got a little hairy around here!! Just don't seem to be as good at multi-tasking as I used to be.

CELERY SALAD ----Really wonderful light salad for the hot summer weather . . . love it!

  • 1 1/4 cup chopped celery
  • 1/2 cup dried cherries, chopped
  • 1/2 cup frozen green peas
  • 1 1/2 T. fat free mayonnaise
  • 1 1/2 T. plain yogurt
  • 1/4 cup chopped, toasted pecans
  • 2 t. lemon juice
  • 1/8 t. salt

Look below to see how what I put in the salad. Notice anything interesting? There is an extra bowl of something that looks suspiciously like peeled, seeded, chopped cucumber. I was trying to make a couple of salads and got the stuff mixed up!

I had put it in before I realized what I had done. It just makes the salad a little lighter flavored and juicier.


This would also be really tasty using craisins instead of dried cherries. I think I will add left over chicken, diced, so that it will be a complete meal in one dish. ;-) not that I am lazy or anything like that!

This is an article that I posted in February and then promptly destroyed my blog site! My daughters could use these tips so I will be adding them over the next few days. Do I have the cutest little mother-in-law or what. The picture is my oldest daughter, Mariah, and Grandma Jeanne at a family reunion celebrating Grandma's 80th birthday. We should all look so good, huh?
The Secrets of Powdered Milk

It's finally time to start sharing some of my favorites using powdered milk. As I have told many who have asked, "Powdered milk is not just for gagging on"!

Let's start with a little secret my cute little mother-in-law taught me a long time ago. I was about to make some glaze for some really yummy, drippy cinnamin rolls. She made them better. She had me heat the milk, very warm but not scald before I mixed the powdered sugar with it. I couldn't believe the difference! It no longer had a "raw" taste. I didn't even know it had a raw taste! that got me thinking and so I did some hunting around and found this great little article on the internet I'd like to share with you. These tips really make a difference. Give it a thorough read, you'll learn a lot of whys even if you knew what to do!

Scalding Milk
Q: I have heard that it isn't really necessary to scald milk, even though the recipe may tell you to. Is this right?
Milk is scalded by heating it to 180°F (82°C). Visually, at sea level, this is the point at which tiny bubbles begin to form. Because water boils at a lower temperature at higher altitudes, this visual clue may be inaccurate (see High Altitude Cooking).
Scalding serves three purposes: it kills harmful bacteria that may spoil the food being prepared, it destroys enzymes that may affect the way the milk performs in the recipe, and it raises the temperature of the milk to speed up results. With modern pasteurization, the bacteria and enzymes are already destroyed, so scalding is no longer necessary to accomplish those goals, although heating the milk may help to encourage the growth of yeast in breads, to better dissolve other ingredients, or to promote desirable bacteria growth for recipes such as making yogurt.
In the case of raising the temperature to speed results, the milk only needs to be heated to the optimal temperature, not necessary all the way to a scald. Temperatures might be in the range of 110°F (43°C) for making bread or yogurt. Always check the recipe to be sure.
The one exception to note is that, according to Shirley O. Corriher in her book Cookwise: The Hows and Whys of Successful Cooking, there may be some evidence that certain proteins in milk may affect the rise of breads. For this reason, she continues to scald milk used in bread baking, as a precaution.
Of course, if you are using raw, unpasteurized milk, then you need to scald it since the bacteria and enzymes have not been destroyed through pasteurization.
Addendum: Thanks to Alton Brown in his recently aired Good Eats episode "Churn Baby Churn 2" for reminding me that there is a fourth purpose in scalding milk, that being that heat increases the amount of flavor that is extracted from some ingredients, such as vanilla beans, for those recipes where other ingredients may be added to the milk while it is being heated.


Hi,
Your article wrongly states that " With modern pasteurization, the bacteria and enzymes are already destroyed, ......". Pasteurization only reduces the amount of bacteria and enzymes to acceptable level.
Posted by: Nishant Mar 12, 2007 at 10:18 AM
Scalding the milk gives a certain good flavor to some recipes. Recipes for vanilla ice cream and custard and many other things. Check it out. My grandmother used to make ice cream to die for. I could not seem to duplicate it using her recipe. The difference turned out to be the scalded milk she used.
Posted by: Julia Jones Jul 12, 2008 at 01:30 PM

Wednesday, June 17, 2009

Thought For the Day . . . or Longer

Our church leaders have always counseled us to make a plan and then work on following it, gradually. This last Sunday, someone in the Sunday class brought up that the commandment to store food and other needs aside during the bountiful years was a spiritual commandment, not a temporal one. It gave me a lot to think about. I had heard that idea before, and let it slip away from me.

I have found it gratifying to see more and more of the younger generation put together their plans and following them. Think of the faith that it shows.

I have always strongly believed that we will be blessed by our obedience to this commandment. I know that Heavenly Father wants to bless us and He is bound by our own actions of obedience or non. The following short story got me thinking about it again. I hope it helps you as it did me in assessing life priorities.


TWO WOLVES

One evening an old Cherokee told his grandson about a battle that goes on inside people.
He said, "My son, the battle is between two wolves inside us all..

"One is Evil - It is anger, envy, jealousy, sorrow, regret, greed, arrogance, self-pity, guilt, resentment, inferiority, lies, false pride, superiority, and ego.

"The other is Good - It is joy, peace, love, hope, serenity, humility, kindness, benevolence, empathy, generosity, truth, compassion and faith."

The grandson thought about it for a minute and then asked his grandfather: "Which wolf wins?"

The old Cherokee simply replied, "The one you feed."

Sunday, June 14, 2009

This is an article that I posted a while back and have brought it up to this newer blogspot. You will find that there will be a lot of chicken and ground beef on sale over the next month or so. Now is the time to preserve it!

Last week, one of the local stores had bottom round roasts for $1.77 a pound. They were willing to grind it for me, so I had them do 20 lbs. for Sarah to use in the break-the-fast meal last Sunday. By having them trim the visible, surface fat, it came out very lean. When she and her committee cooked it up, there was less than a quart of fat and juices from 20lbs. That is lean!

Hope this gives you some good ideas!

I’ve been pretty busy this past week, making those pennies squeal!

First, I went crazy buying & canning chicken breasts for $.87 per lb. When I priced the canned chicken at Costco and figured it out, it came to $2.35 per lb. For 34 lbs. I figured it was a savings of $ 57.00!

Next, I canned up 25 lbs. of boneless beef that I paid $1.77 per lb. When I figured up the cost of buying the 12 oz. cans at Costco it was $3.30 per lb. It came to a savingsof $38.25.

Last, I decided to can up some of the 4-H pig that I split with a friend last fall. This was just for the price of the lids … OK guys, I had some electricity to pay for, but when you figure all the power I wasn’t burning running the furnace, TV (too busy) and who knows what else, I figure it was a wash on that one!

For about $105.00 I now have:
1. Chicken--33 qts.
2. Beef------ 31 pints
3. Pork----- 14 pints
4. Sausage -- 8 pints

All stored, cooked, de-fatted & ready-to-eat.

I followed the guidelines found at:

http://www.uga.edu/nchfp/questions/FAQ_canning.html#top . I strongly suggest that if you do this kind of canning, you check out this website. The directions are simple and accurate.

***After taking a semester of food science classes at University of AZ (training to serve in one of the church canneries as a cannery operator) I cannot stress enough, how important it is that you use an information source such as this! The pathogens found in improperly processed foods can be deadly, please don’t just go by how “Aunt Bruhilda” always did it.

Cucumb-a-rama


Today I made my first cucumber salad. It was pretty straight forward.

Cucumber Tomato Basil Salad
  • 2 cucumbers, quartered lengthwise and then sliced
  • 3-4 fresh basil leaves, chopped
  • 3 green onions, chopped
  • 10 black olives, sliced
  • 2 tomatoes, diced
  • Fat Free Zesty Italian Dressing (Kraft is my favorite)
  • Feta or mozarella cheese
Mix everything in a bowl, except the tomatoes and cheese. Chill for a couple of hours. Add the tomatoes just before serving. Sprinkle with mozarella cheese on individual servings.
*** All I had was a generic dressing and it wasn't as zingy as the Kraft is. A dressing made of wine vinegar and olive oil would be even better.

Saturday, June 13, 2009

My New Hobby. .. . Kind of

This Mango Salsa was so yummy, I made a second batch!

Mango Salsa
  1. Combine all the ingredients in a glass or plastic container; cover and chill.
  2. Enjoy.

The Mango Pineapple Chicken was really good too. Sorry, no pictures, It was for Sunday dinner with the family and didn't have time to worry about that!

MANGO PINEAPPLE CHICKEN

Ingredients

  • 4 chicken breasts, diced
  • 2 fresh mangoes, diced
  • 1 can pineapple tidbits
  • 1 red pepper, diced
  • 1 green pepper, diced
  • 6 stalks celery, diced
  • 1 square box of fresh mushrooms, sliced
  • 1 zucchini diced
  • 1 jalapeno pepper, seeded and minced finely (optional)
  • 1 clove garlic, minced finely
  • 1 bunch green onions, finely diced & separate white part from greens
  • 2 tablespoons fresh cilantro chopped
  • 2 teaspoons lime or lemon juice
  • 1 t. fresh ginger root, grated
  • 1/2 teaspoon red pepper flakes (optional)
  • 2 tablespoons extra virgin olive oil (I used peanut oil so that it wouldn't smoke)
  • salt and pepper (to season)

Directions

  • Chop all of the veggies and chicken.
  • In a hot skillet with the oil, stir fry chicken.
  • When the chicken is almost don, add all everything else except the mangos and onion greens.
  • Stir fry it all just until the it is just until it is all heated through. If you don't want your veggies crunchie, cook a little longer.
  • At last minute, add the mangos and onion greens. Stir around for about one minute to heat it all through. Serve over rice. Sometimes my family likes to have dishes like this over chow mein noodle. Not the nasty, crunchy kind from a can! I get them from Wal-mart or an Asian food market and cook them up in water.

Mango and Pineapple Jam---very good

  1. Peel mango and cut in small pieces, then mash with potato masher to bring juice out or whirl in a food processer.
  2. Cook 5 minutes.
  3. Add rest of ingredients, mix well and bring to a boil.
  4. Boil rapidly 15 to 20 minutes, stirring often, until thick.
  5. Pour into small sterilized jars.
  6. Seal and store in cool place

To review the Tomatillo Salsa, or Salsa Verde. Click HERE

Wednesday, June 10, 2009

Aphid War Update

I did the soapy water spray on my collards and broccoli plants that had picked up a few too many residents. I sprayed all over the place until the leaves were dripping. then I sprayed all over the ground underneath in case some had dropped there. Everyday I treated the leaves the same and found significantly fewer by the third day. Now, I check them every two or three days. In fact, today while I was taking pictures, I checked and found a few. . . . out came the soapy water!

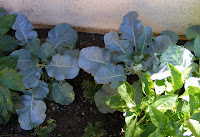
The broccoli showed very little damage and the collard greens had some damage on a few leaves, but look at them now!

I have planted some marigold flowers amongst the plants to try to help with the garden pests. I have also plants some other flowers that are supposed to attract butterflies and humming birds. I hope they will bring in more of those nice critters than bees ;-)

1. Collard greens, ready for picking a little snack. 2. Two of the broccoli plants. 3. My crazy little anaheim peppers in the crazy little tub. These seem to be the happiest little plants in my little garden!


Judging from the color in some of the leaves, I need to do a little fertilizing!

Liz shared a great website with me that has tons of good guidelines on it . . . . Check it out HERE! I am treating my squash plants with the calcium to see if I can get some of my many little squash to last long enough to ripen and pick! I am going ahead treating the zucchini plant at the same time, just in case. I have also swiped the zucchini back from my daughter,( can you believe it) and planted it next to the big plant I already have growing. I hope it will have more little boy blooms to "court" my little girl blooms. Growing it in a pot wasn't working very well. Hopefully, I have not waited too long and it will revive in the ground.