Tuesday, May 4, 2010

Summer is Coming!

I am busy like all other gardeners and still babysitting the world's most adorable grandkids, usually my monkey boys, if you get my drift.  But hang in there with me!

Our weather has been getting hot, cooling off  . . . . back and forth.  So blame Mother Nature for my not getting my summer kitchen up and running.

HERE IS WHAT IS COMING UP: 


  • Getting the Heat Out of the Kitchen  -- Summer cooking on your patio or under shade in your back yard.  I;ll even swallow my pride and share with pictures this year.
  • Camping  ---  Baking on your Coleman stoves (liquid and propane), dutch oven cooking & whatever comes up as I go along.  Once I get going here I will remember other ways I have used to feed up to 50 people using only camp equipment!
  • Cooking with Limited Resources -- You never know when you may lose your power or gas source.  we used to have happen every summer in the violent summer storms.  We still do, or when a drunk driver takes out a pole or two.
  • Wonder Box Cooking -- I recently made some pinto beans, took pictures and then got sidetracked with grandkids so they sat there for 8 hours.  They were good and soft, but beans can be dangerous.  I would NOT suggest that!  Anyway, I  have taken my wonder box out, shooed my  two legged and four legged puppies off of it.  I have also put it into a box that was just the right size.  I will share some pictures of it & where to get one if you are interested.
Hoping you will stay in touch!

Sunday, May 2, 2010

STRAWBERRY CHEESE CAKE - NO BAKE, HEALTHY & DELICIOUS!

Last year I posted this on making a No-Bake Cheese Cake.  You can see this post HERE.


Today, I finally got around to making one with a crust, a wonderful glaze (if I may say so myself) that went over with all ages, 6 months to 62.  Hope you take the time to try this one.


CRUST: 

  • 1/2 cup butter or margarine
  • 1/4 cup powdered sugar
  • 1 cup flour
Combine melted butter, flour & powdered sugar.  Mix well.  Press into a 9" - 10" pie pan or 9" square pan.  Bake at 350 degrees for 20 minutes.  Cool.

FILLING:


Mix:
  • 1 envelope unflavored gelatin (2 t.)
  • 1/2 c. sugar
Add:
  • 1 c. boiling water ( I heated it in microwave to good & hot)
Mix until gelatin is dissolved, about 5 minutes.

Beat until smooth:
  • 2 c. (2-8 oz. pkgs. ) cream cheese (of course I used some that I had made from powdered milk!)
  • 2 t. vanilla
Add hot mixture gradually the cream cheese mixture while beating. Pour into prepared crust.  Chill until set.

GLAZE:


  • 1 1/2 c. "Strawberry" juice (frozen Apple, Kiwi, Strawberry concentrate)


  • 1 1/2 c. water


  • 2 T. sugar
1.  Mix sugar and gelatine together and set aside.
2.  Mix juice concentrate and water in a pan, bring to a boil.
3.  Add sugar/gelatine mixture and stir until dissolved.
4.  Cool then spread over cheese cake.
5.  Sprinkle the sliced strawberries over top.
6.  Chill for at least 30 minutes.

This glaze was pretty "tangy" and was enough to cover a 13" X 9" rectangular pan.  It has so much flavor.  The whole family hadn't realized that the glaze that you buy in the store had no flavor.

I doubled the cheese cake filling and the crust to fill the 13" X 9" pan.  

Saturday, May 1, 2010

BOUNTIFUL BASKET - - - - - MAY 1st - - - - - Here's Some Ideas!

Mexican Gray Squash  -   HERE

Cucumbers  - HERE 


Salsa Verde, using Tomatillas  -  HERE


Looking for the Grilled Artichoke Recipe!

Thursday, April 29, 2010

HERBS FOR YOUR GARDEN!


I just found a wonderful post all about herbs in your garden.


I just made tomato soup using basil and oregano from my garden.  It is so delicious!  If you haven't started planting, hop to it!


Check it out the post HERE.

Friday, April 23, 2010

POWDERED MILK - - - - REALLY USING IT DAILY

Right now I am using powdered milk daily, several times daily.  Putting myself on rations has been good for me.  I am finding out where I have stored way too much and where I am perhaps short.

Other good information I have gained, is that. as short as we feel we are financially, we are doing better than we were 25 - 32 years ago.  Back then I wouldn't have cut a hot dog up in our omelet this morning and I would have used re-hydrated TVP that had been saute'ed in bacon grease.

I always go looking for new information when I return to using my supplies.  It's impossible to have too much information, at least in this department!

Today I am gleaning all I can from this website on EHow.COM .  Check it out HERE.


Little Side Note  - - I have always mixed my non-instant powdered milk in  blender.  I bought this little gem to make baby food and other small blending jobs.  Since it had a smallish traditional blender top, I sent my big top over to my single daughter and her roomies.  Little did I know that this top would allow milk to slosh everywhere!  I really don't need any help in the messy dept.


Yesterday I decided to try the way that my mom always blended flour and milk or water for gravy.  


I put half the water in a gallon jug, added all the powder needed to make a gallon of milk and shook it for a while.  Let it sit to allow any lingering lumps to get soggier.   Shook it a little more and its the best blending job I've had.  No powder sticking to the sides or lid.  Definitely the way to go for me from now on!

Thursday, April 22, 2010

Are You Rotating Your Freezer Storage?

I have been digging deeper in my freezer and finding a few items that would reach out and grab me if they could . .  you know kind of like those funny little items in the back of your fridge growing fuzz, feathers, and unmentionable stuff that polite people don't mention.

Fortunately, I have been pretty determined to keep everything labeled, including a date.  I am finding that the date isn't always a good indicator of the condition of the food.  In the previous post, I made Guacamole out of an avocado that I tossed in there last summer, just in its own skin. It was fine.  Tonight I took out some turkey that frozen in November.  There was no frost in the bag or any dry looking spots.  It had a little bit of an "off" flavor to it.  So out came the pot and in went the seasonings to simmer and make it tasty again.

Though freezing may not be the way to store most of our food, it is a wonderful invention which enables us to enjoy the fresh flavors of summer and autumn, so be sure to keep a good way of rotating it as well.

I had a huge chest type freezer for years and the bottom was impossible to rotate the foods in.  I ended up using five gallon buckets to sort everything, preferably with handles for lifting out.  After covering the bottom of the freezer, I created a second layer of buckets on top.  The top ones were so much easier to lift out of the way than the long baskets that came with the freezer were.

Because of change of circumstances and my family shrinking (growing up and leaving home), watching other's freezers quitting on them (mine was even older than any of their's, YIKES!)  I decided to down size and get an upright.  I found it no easier to keep organized for rotation and boy howdy did it hurt when something fell out on your toes!

So I spent several weeks looking for just the right size baskets to organize and act as "drawers".  It's working a lot better.  Now I can pull out a manageable weight to go through and find what needs to be used.

GUACOMALE - - - - - - BUDGET STRETCHER PANTRY STYLE


GUACAMOLE- - Pantry Substitutes in Red

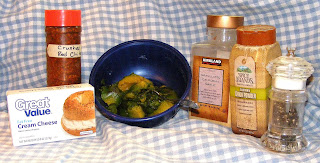
1 - avocado, frozen (this one was about 6 " long)  of course a fresh one is even better
2 -  medium tomatoes (or canned diced tomatoes)
1/2 t. crushed red chili pepper (or red chili powder)
1 t. minced garlic (1/2 t. garlic powder)
2 T.  minced onion  or  1/4 c. chopped gr. onion
(1. t. onion powder)
3 T. lime juice (lemon juice is OK, just not as tasty)
1/2 t. salt
**2 oz. cream cheese, softened (If using an avocado that was in the freezer, it will have the translucent appearance like you see in the next picture.  The cream cheese give is a creamier consistency and more normal appearance)


1.   I took this picture and then almost immediately changed it into a better shaped spaghetti bowl. I mash the avocado and cream cheese with a fork, stirring and mashing until it is very small chunks.  You can use a food processor if you would prefer a smoother consistency.


2.  Dice the tomatoes.  These are about 1/2"  - 3/4" in size.  Closer to 1/4" will disperse through the mixture better than this did.  :-)


Now is the time to add your garlic, onion, lime juice, salt and crushed red
chili peppers.

  Mix it really well.  Before you add more salt, try it on a chip.  Most have a lot of salt on them which will make a difference in the taste as you are munching!


  1. Now put the kids to bed or send them home with their parents.
  2. Find a good movie.
  3. Put your feet up.
  4. Enjoy!!
Little side note:  When I was growing up Guacamole was smash an avocado and mix it with some Mt. Pass Taco Sauce, the whole 4 oz.  can.  Salsa hadn't been thought of, especially in the big old jars like it comes now.  Mom loved it when I grew up and started to get serious with kitchen experimentation!