Saturday, June 13, 2009

My New Hobby. .. . Kind of

This Mango Salsa was so yummy, I made a second batch!

Mango Salsa
  1. Combine all the ingredients in a glass or plastic container; cover and chill.
  2. Enjoy.

The Mango Pineapple Chicken was really good too. Sorry, no pictures, It was for Sunday dinner with the family and didn't have time to worry about that!

MANGO PINEAPPLE CHICKEN

Ingredients

  • 4 chicken breasts, diced
  • 2 fresh mangoes, diced
  • 1 can pineapple tidbits
  • 1 red pepper, diced
  • 1 green pepper, diced
  • 6 stalks celery, diced
  • 1 square box of fresh mushrooms, sliced
  • 1 zucchini diced
  • 1 jalapeno pepper, seeded and minced finely (optional)
  • 1 clove garlic, minced finely
  • 1 bunch green onions, finely diced & separate white part from greens
  • 2 tablespoons fresh cilantro chopped
  • 2 teaspoons lime or lemon juice
  • 1 t. fresh ginger root, grated
  • 1/2 teaspoon red pepper flakes (optional)
  • 2 tablespoons extra virgin olive oil (I used peanut oil so that it wouldn't smoke)
  • salt and pepper (to season)

Directions

  • Chop all of the veggies and chicken.
  • In a hot skillet with the oil, stir fry chicken.
  • When the chicken is almost don, add all everything else except the mangos and onion greens.
  • Stir fry it all just until the it is just until it is all heated through. If you don't want your veggies crunchie, cook a little longer.
  • At last minute, add the mangos and onion greens. Stir around for about one minute to heat it all through. Serve over rice. Sometimes my family likes to have dishes like this over chow mein noodle. Not the nasty, crunchy kind from a can! I get them from Wal-mart or an Asian food market and cook them up in water.

Mango and Pineapple Jam---very good

  1. Peel mango and cut in small pieces, then mash with potato masher to bring juice out or whirl in a food processer.
  2. Cook 5 minutes.
  3. Add rest of ingredients, mix well and bring to a boil.
  4. Boil rapidly 15 to 20 minutes, stirring often, until thick.
  5. Pour into small sterilized jars.
  6. Seal and store in cool place

To review the Tomatillo Salsa, or Salsa Verde. Click HERE

Wednesday, June 10, 2009

Aphid War Update

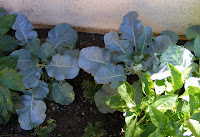
I did the soapy water spray on my collards and broccoli plants that had picked up a few too many residents. I sprayed all over the place until the leaves were dripping. then I sprayed all over the ground underneath in case some had dropped there. Everyday I treated the leaves the same and found significantly fewer by the third day. Now, I check them every two or three days. In fact, today while I was taking pictures, I checked and found a few. . . . out came the soapy water!

The broccoli showed very little damage and the collard greens had some damage on a few leaves, but look at them now!

I have planted some marigold flowers amongst the plants to try to help with the garden pests. I have also plants some other flowers that are supposed to attract butterflies and humming birds. I hope they will bring in more of those nice critters than bees ;-)

1. Collard greens, ready for picking a little snack. 2. Two of the broccoli plants. 3. My crazy little anaheim peppers in the crazy little tub. These seem to be the happiest little plants in my little garden!


Judging from the color in some of the leaves, I need to do a little fertilizing!

Liz shared a great website with me that has tons of good guidelines on it . . . . Check it out HERE! I am treating my squash plants with the calcium to see if I can get some of my many little squash to last long enough to ripen and pick! I am going ahead treating the zucchini plant at the same time, just in case. I have also swiped the zucchini back from my daughter,( can you believe it) and planted it next to the big plant I already have growing. I hope it will have more little boy blooms to "court" my little girl blooms. Growing it in a pot wasn't working very well. Hopefully, I have not waited too long and it will revive in the ground.

Monday, June 8, 2009

HELP!!! HELP!!!


My yellow squash bush is blooming and producing like crazy. The only problem is that the poor little squash keeps rotting on the bloom end. Does anyone know why this is happening and what I can do about it?

I am also fighting wilt like crazy on my tomatoes. They are in a bed that has never had tomatoes in them before and live in the hotter regions of AZ. Any suggestions on how to control that problem??

Promised Results . . . with pictures

1. This is what I added to the two to two and half lb. roast: potatoes (cut up in about 1 inch pieces), 1/2 medium onion, (sliced), carrots, chopped in bite sized pieces, fresh rosemary leaves, stripped from stem and chopped fine, 1/2 cup flour, salt and pepper to taste. At the last minute I threw in small can of mushrooms, drained, that's why it isn't in the picture. 2. Brown the roast while you are chopping up the veggies. 3. Place the flour, all the veggies in the cooking bag. Shake them around until everything is coated. Add the roast and shake it all around . . . one more time.
1. This is what it looked like before adding the roast. Place the bag in a pan deep enough to cover it all with water. Gather the edge together, close it securely. (I used a black binder clip) Make sure this is out side of the pan with the lid on. Add enough water in the pan that the cooking bag was covered. Bring to a boil I for 15 minutes. I put this in the "nest" (wonder box) at about 9:30 am. When I got home at a little after 6:00pm. I stuck the remote thermometer (thermometer attached to a cable that is attached to the in to see what the temperature was. It registered 139 degrees F. the veggies were done, but not mushy. The cute little roast was pretty tough. 3. I took it all out of the bag and put it all into the oven to cook it a longer, at 250 degrees, until the roast was tender. I should have left the veggies out, they are a little softer than I would have liked.
I think this would work better with the meat cut up in bite size pieces, as well as the veggies. The heat could penetrate it and tenderize it a lot better, just like it does in a foilie dinner on the coals around the camp fire. A little more moisture would also help. Liquid would help distribute the heat faster. I left a little air in the bag as well. I believe that the heat would have penetrated better if there had not been the air pocket to insulate the food.

Saturday, June 6, 2009

THE WONDER BOX, STEP-BY-STEP PICTURES

Well, I finally got around to making the wonder box. When I sat down and really read the directions, they weren't vague, I was just tired and dense. They are great and I have just added some pictures. I also had to think dimensional and not flat to get it. I suddenly remembered making stuffed toys, many years ago, and realized why I wasn't getting it.

June 7-- I have put a pork roast with mushrooms, potatoes and carrots in the wonder box. Tonight's post will have the pictures of the process and the results . . . sure hope I don't embarrass myself putting this one on!

1. This takes about 3 yards of fabric or one old sheet that was on the top, so it has lots of wear left in it. Thanks Bri! 2. Lay it out so that you can cut 4 of each piece. 3. Don't forget to stop and smell the roses . . . OK, maybe just to share the table for the most important things in life. "Fun" with the little ones who are growing up way too fast.

1. I blew up the pictures to try to show the broken lines I put in on the stitching line . . . to make sure that I did it in the right places. I had a four year old "helping" me. I can get sidetracked pretty easily without help . . . and this morning was a k'nex morning besides! Remember that you just need to leave an opening for filling. I almost started filling without closing the second one. That would have been lot of fun!


1.
Sew the two long sides starting at the 90 degree mark to the opposite end. I used dark thread so that you can see the stitching. I also used a stretch stitch in case it is pulled. It makes three rows of stitching that have some give and may avoid escaping beans later. They make a horrible mess. At least the bean bag I had in the 70's and 80's did! 2. Find the right sides, put them together and stitch all around. 3. Here is the whole thing sewn together. Turn it right side out and it is ready to fill!


1. I lucked out and had a big funnel from a strainer that I use to make apple sauce, tomato sauce and stuff like that. I taped it on to make it easier to fill the bag myself. 2. It worked really well. 3. Sew the opening up with just regular large stitches, in case the amount of styrofoam beans needs to be adjusted.

1. This a six quart pressure cooker that is 10" in diameter & 6 " deep. 2. 8 inches wide and 4 deep inches . I was pleased to find that the bottom was versatile. 3. I'm not sure how they got the whole thing to look so symmetrical in the internet article, but I suppose that it would cook just the same looking like it was from a Dr. Seuss book :-)

August 7 - - - -Just found these great pics to demonstrate the construction of a Wonder Box. Click HERE.

Wednesday, June 3, 2009

More Soap Results

The wonder box is on the way!!! The directions are a little vague, but I think I have it figured out now. I am taking pictures so hopefully, I can put them on tomorrow (dare I say that?). I can't even blame having the grand kiddies over, just have to many irons in the fire!! Please be patient, I am anxious to use it myself!!

**************
It cost $1.30 for 1 quart of dry laundry soap. If you have a regular capacity washer and average soiling on your laundry, that will take 1 Tablespoon. That would give you 64 loads of laundry. I have been using 2 T. per load because I have the largest capacity washer, made by Maytag about 1998 0r 1999. I did use 3 T. on an especially dirty stinky load. I should get 30 loads for $1.3o. I am pretty pleased with that.
**************

1. This spot has been washed, bleached with a Clorox pen, soaked, treated with a grease buster, you name it! It got the color out finally, but never would just disappear for me. 2. Today it did!


1. This stain had not been treated or washed before today. 2. It is lighter, but not completely gone. I'm going to bleach it now with the bleach pen, wash it one more time and see if the discoloration can be wiped out.

TOMATILLO SALSA . . . under the tutelage of a really great cook!

To make the Salsa Verde, you will need:
  • Tomatillos (Ihappened to have 3/4 pounds, so Maria gave me amounts according to that)
  • 3 Garlic cloves
  • 6-7 Tepin chiles
  • Salt, to taste, I used 1/4 teaspoon
All of the recipes I found on the internet didn't seem quite right. I went to my friend Maria and found out why! The ingredients needed to be roasted! She grew up in Sonora, Mexico and knows the real thing. I have never tasted anything that she has cooked, Mexican or American, that wasn't out of this world. She has agreed to let me document her making the best tortillas in the world for the blog. You will see that she is a beautiful person, through and through!


1. Pan roast the 3/4# tomatillos, for the best flavor, roast them on the BBQ. I have never BBQ 'ed tomatillos, but it sure makes green chiles fantastic! It's easier if the tomatillos about the same size. Mine were very different and it made it a little tricky to get them all done without burning any of them.

2. Pan roast the 2-3 garlic cloves, sliced and 6-7 tepins for mild (Maria uses 10-12!). 3. Cut the little cores from the tomatillos. 4. Put everything you have toasted into the food processor or blender and give a good whirl! ( I used the highest speed) It made 2 full cups of salsa. 5. Time to do the "QC" (quality control) test! 6. Salt to taste, I used 1/4 t. Most would want more than that.